matelso OAuth Integration (Microsoft 365)
Integrationen
This article explains how to configure an Microsoft OAuth account within the matelso control panel.
What is OAuth?
OAuth is an authorization standard with great adoption within the market. Google and Microsoft are just two examples of companies that protect their services using OAuth.
There are a numbers of extensions to OAuth but within the matelso system we only support the refresh-token flow. RFC6749 Refresh Tokens
This part of the specification is used widely in the server-server context and is therefore how we setup this account.
TLDR: OAuth Refresh Token Flow
A refresh token is a special string that can be used by an application (client) to acquire an access-token via an authorization server. This access-token can then be used to access protected resources or perform actions on resources. eg. sending a mail via outlook or sending data to bing-ads.
Create client
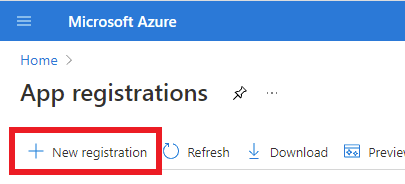
In order to access resources behind OAuth, the application must first be registered. An application in OAuth is called a client. In our example, we set up a client via the Azure portal. Azure portal - App registrations. As soon as we open the portal via the link above, the dialogue for registering an application opens.
If this does not happen automatically, we click on the following button:
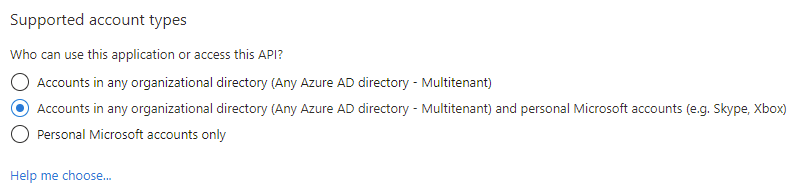
In the registration dialogue we enter a name, the supported types of accounts and forwarding URIs.
Name: Here we assign a name that is displayed to a user of the application. In our example, we set the name to "Matelso Integration Demo".

Type of supported accounts: This input specifies which types of microsoft accounts can login to our application. To make it easy and not explain every subtype of account we just pick "Accounts in any organizational directory (Any Azure AD Directory - multitenant) and personal Microsoft accounts (e.g. Skype, XBox)".
Redirect URIs: The redirect URI is the URI we are redirected to after successful login. In this example I will use my demo page.

After clicking on the "register" button we will be redirected to the details page of our application. On this details page we will find some important information.
Client Id & Client Secret
For the next steps we need to have the client id and the client secret of our newly created application. On the details page we find the Client Id.

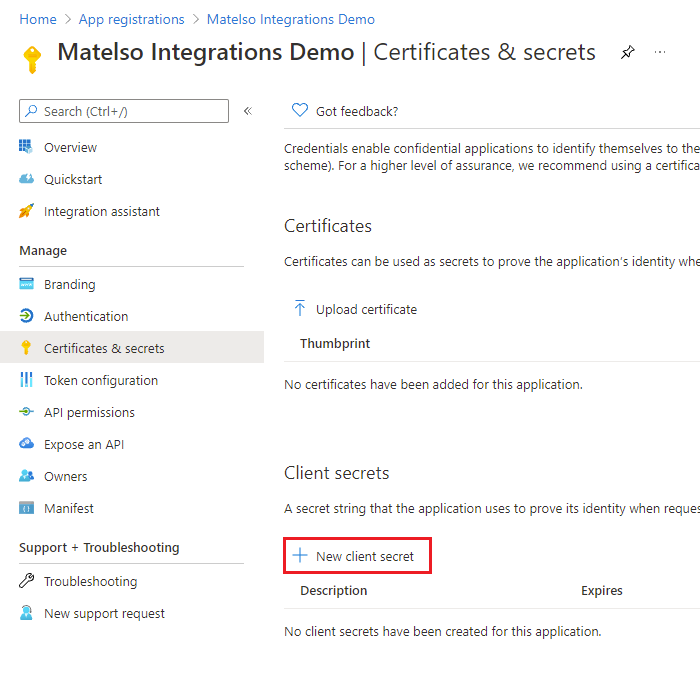
In addition we must create a new client secret. To create a new secret we click on the link on the details page:

After clicking this link we get redirected to "certificates & secrets". On this page we click "new client secret".
After clicking this button we see a dialog on the right side of the screen.
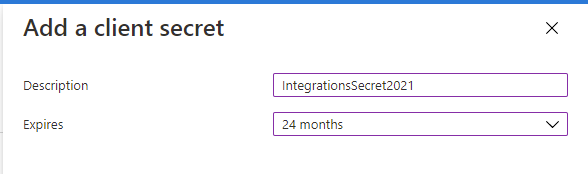
Within this dialog we fill in our description for the secret and pick the lifetime of this secret. In this example I pick 24 months. We click on the "add" button and copy our newly created secret.

Scopes
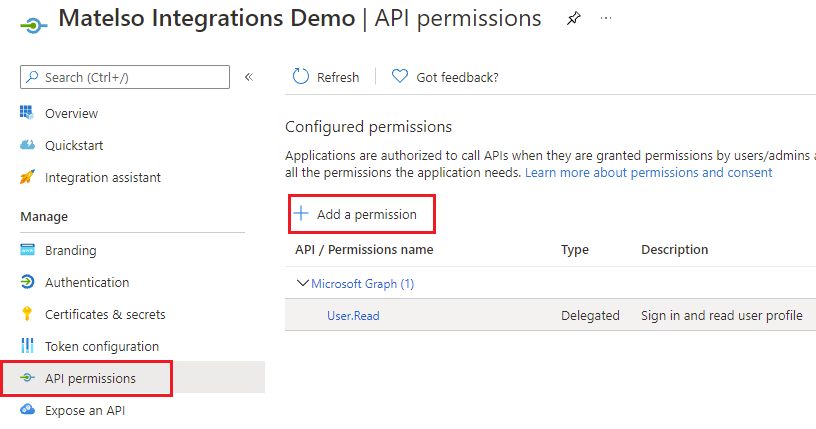
After creating the secret we have to add services the application can access (scopes). To add a new service we navigate to "API permissions" and click the "Add a permission" button.
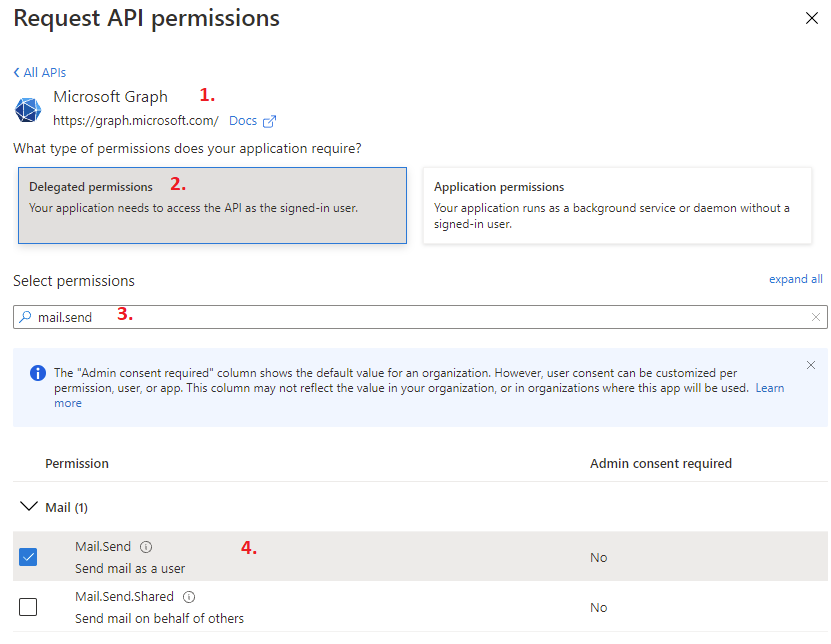
We see a new dialog on the right side. For this example navigate to "Microsoft Graph" -> "delegated permissions" and search for "mail.send". In the filtered results we pick the "Mail.Send" permission and click on "add permissions".
Generate Refresh- & Access-Token
In order to obtain a Refresh & Access token, we must log in to our application with our Microsoft account. To do this, we create a URL with the following pattern.
https://login.microsoftonline.com/common/oauth2/v2.0/authorize?
client_id={ClientId}
&response_type=code
&redirect_uri={RedirectUri}
&response_mode=query
&scope=openid%20offline_access%20{Scopes}
&state=12345
There are 3 placeholders in this URL. We still have to fill in these placeholders. Before we enter the values in the placeholders, they must be URI-coded. This means that certain special characters must be replaced.
Der Platzhalter {ClientId} wird durch unsere erzeugte Client Id ersetzt.
Statt {RedirectURI} geben wir die gleiche Redirect-URI an wie beim erzeugen des Client. In meinem Fall https://www.matelso-maw.com/ oder codiert: https%3A%2F%2Fwww.matelso-maw.com%2F
Der Platzhalter {Scopes} wird mit zusätzlichen Berechtigungen, durch Leerzeichen getrennt, befüllt. Beispielsweise https://ads.microsoft.com/msads.manage oder Codiert https%3A%2F%2Fads.microsoft.com%2Fmsads.manage für die Bing-Ads API.
Sobald wir die Platzhalter in der URL ausgetauscht haben, entfernen wir die Zeilenumbrüche und öffnen die URL in unserem Browser.
Sobald wir diese URL geöffnet haben, öffnet sich die Microsoft Login-Seite. Hier melden wir uns mit unserem Microsoft-Konto an. Nach der Anmeldung, sehen wir welche Berechtigungen die Anwendung von uns als Benutzer benötigt (Consent-Screen).
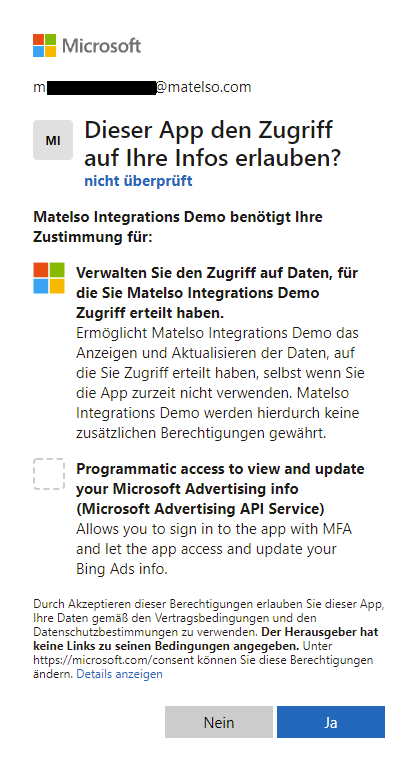
We grant all the requested permissions by simply clicking on "yes" and get redirected to our redirect-uri. It is important to note that the URL we get redirected to includes additional values (code and state). The state parameter contains the same state as our login url and can be ignored. The code parameter contains our auth code which we can exchange for and access-&refesh-token pair.

As soon as we have opened this URL, the Microsoft login page opens. Here In OAuth, this code (Auth Code) + Client Id + Client Secret can be exchanged for a Refresh & Access Token pair. To do this, we open Postman and open a new request. we log in with our Microsoft account. After logging in, we see which permissions the application requires from us as a user (Consent Screen).
In this request we choose the method "POST" and set the URL to the following URL.
https://login.microsoftonline.com/common/oauth2/v2.0/token
Now we open the tab "Body" and select "x-www-form-urlencode".
Then we enter various values.
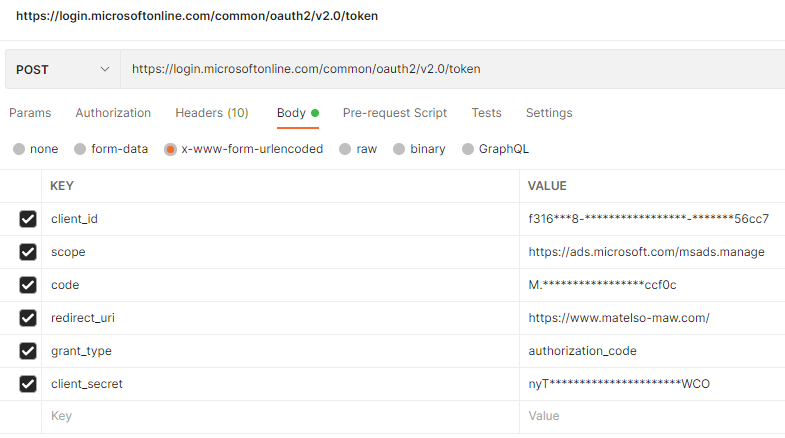
As "client_id" we insert our client id.
For "scope" we insert our requested services & permissions again.
"code" needs to be filled with our auth code from the redirect url.
As "grant_type" we use "authorization_code". This tell the token endpoint that we want to exchange our auth code for an access- and refresh-token pair using the code flow.
"client_secret" needs to be set to the client secret we created.
Now we click and send and see that the response contains 3 tokens. "access_token", "refresh_token" and "id_token". We only care about access and refresh. We copy those tokens and log in to the matelso control panel.
Microsoft OAuth within the matelso control panel
To add an OAuth account in the matelso control panel we navigate to "Configuration"->"Integrations 2.0" and open the accounts tab.
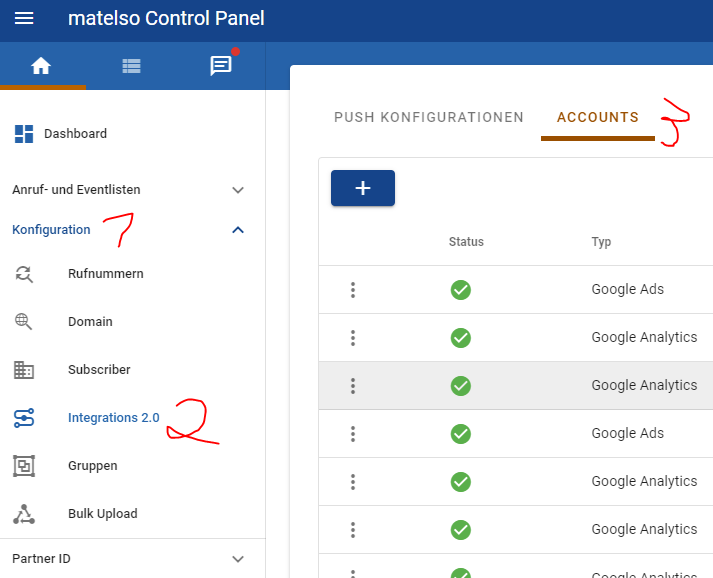
On this page we click the "+" button and select "OAuth Account" in the dropdown menu.

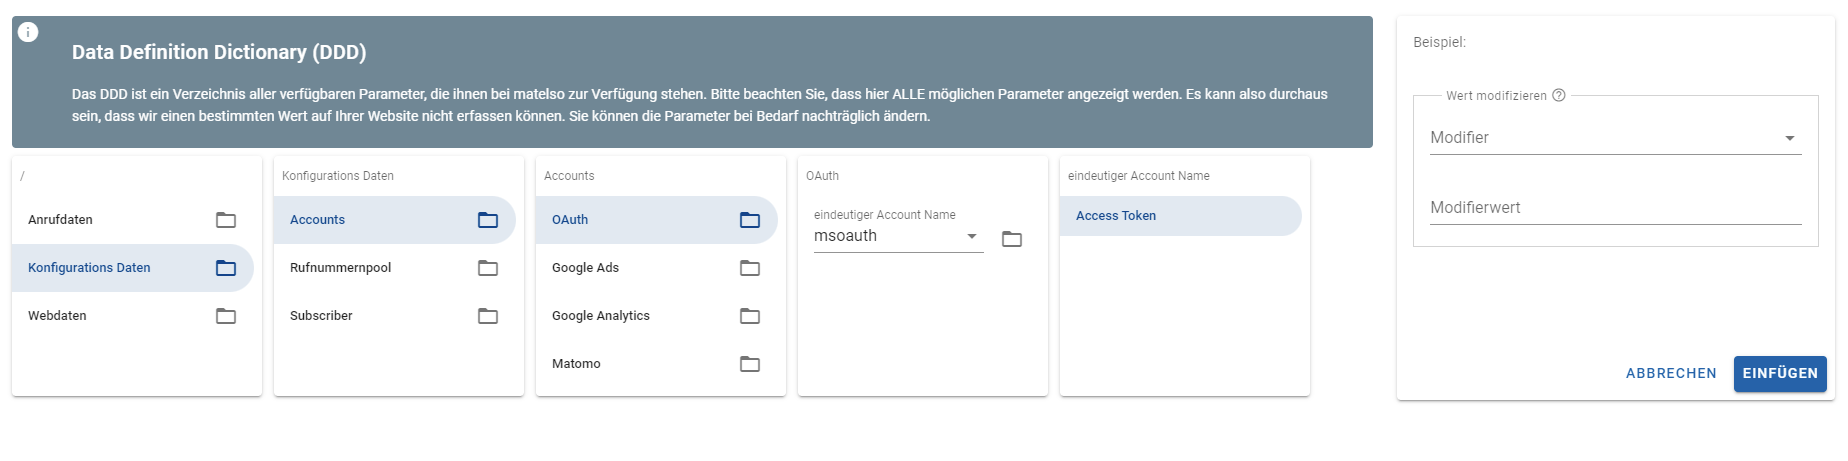
In dem jetzt geöffneten Pop Up tragen wir als erstes eine Beschreibung ein. Diese Beschreibung dient zur eigenen Organisation im Account. Nach der Beschreibung vergeben wir einen "Parameter Name im DDD Browser". Dieser wird benötigt um in einer Push Konfiguration auf den Access Token zuzugreifen. Als nächstes befüllen wir die Felder für Access- und Re fresh-Token mit unseren erzeugten Tokens.
Die URL setzen wir auf folgenden Wert:
https://login.microsoftonline.com/common/oauth2/v2.0/token
Nachfolgend tragen wir noch ein paar Post-Body Werte ein:
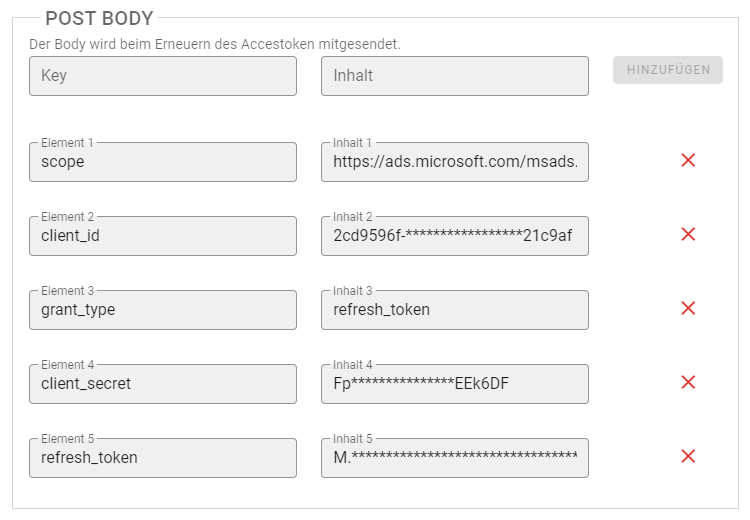
"scope", "client_id" and "client_secret" get filled the same way as in our postman request.
The "grant_type" will be "refresh_token" this time. This tells the token endpoint that we want to use our refresh token to get a new access token.
And last but not least we set the "refresh_token" field to our refresh token.
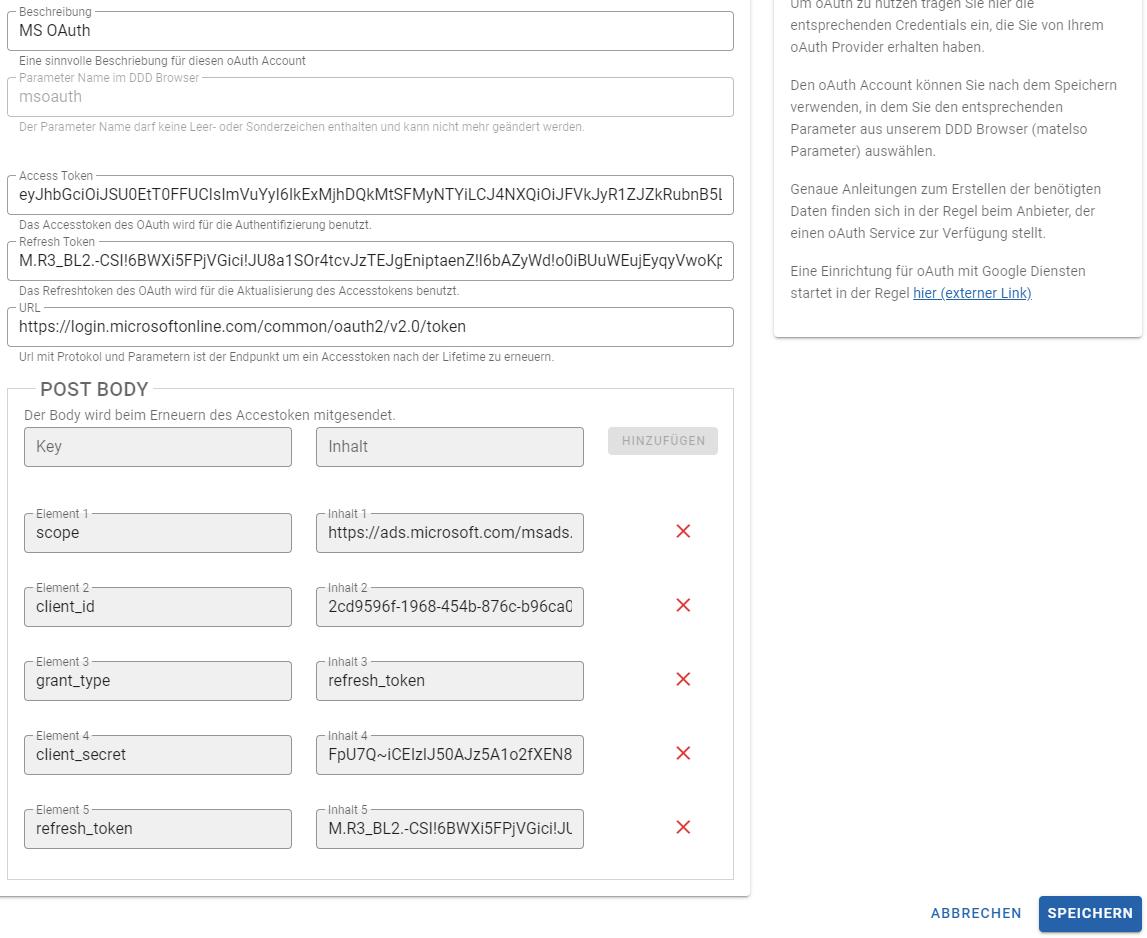
After clicking on "save" we can use the access token in push configurations using the DDD Browser.